init 是 Android 系统启动的第一个用户空间进程,它的主要工作是对系统进行初始化,然后启动系统的各种核心服务。我们知道,Android 可能运行在各种不同的产品上,不同的产品所需要启动的服务也是有很大的差异的。为了满足不同产品的需求,init 进程把一部分初始化工作交给 init.rc 配置文件来管理。init.rc 以 Android Init Language 作为语法,下文我们简称 Android Init Language 为 init 语言。配置文件的主入口文件是 /init.rc,这个文件会通过 import 引入其他的配置文件。本文中,我们统称这些文件为 init.rc。下面我们就来详细介绍一下 init.rc 的语法细节。
我们先来看一下 init.rc 的语法结构图: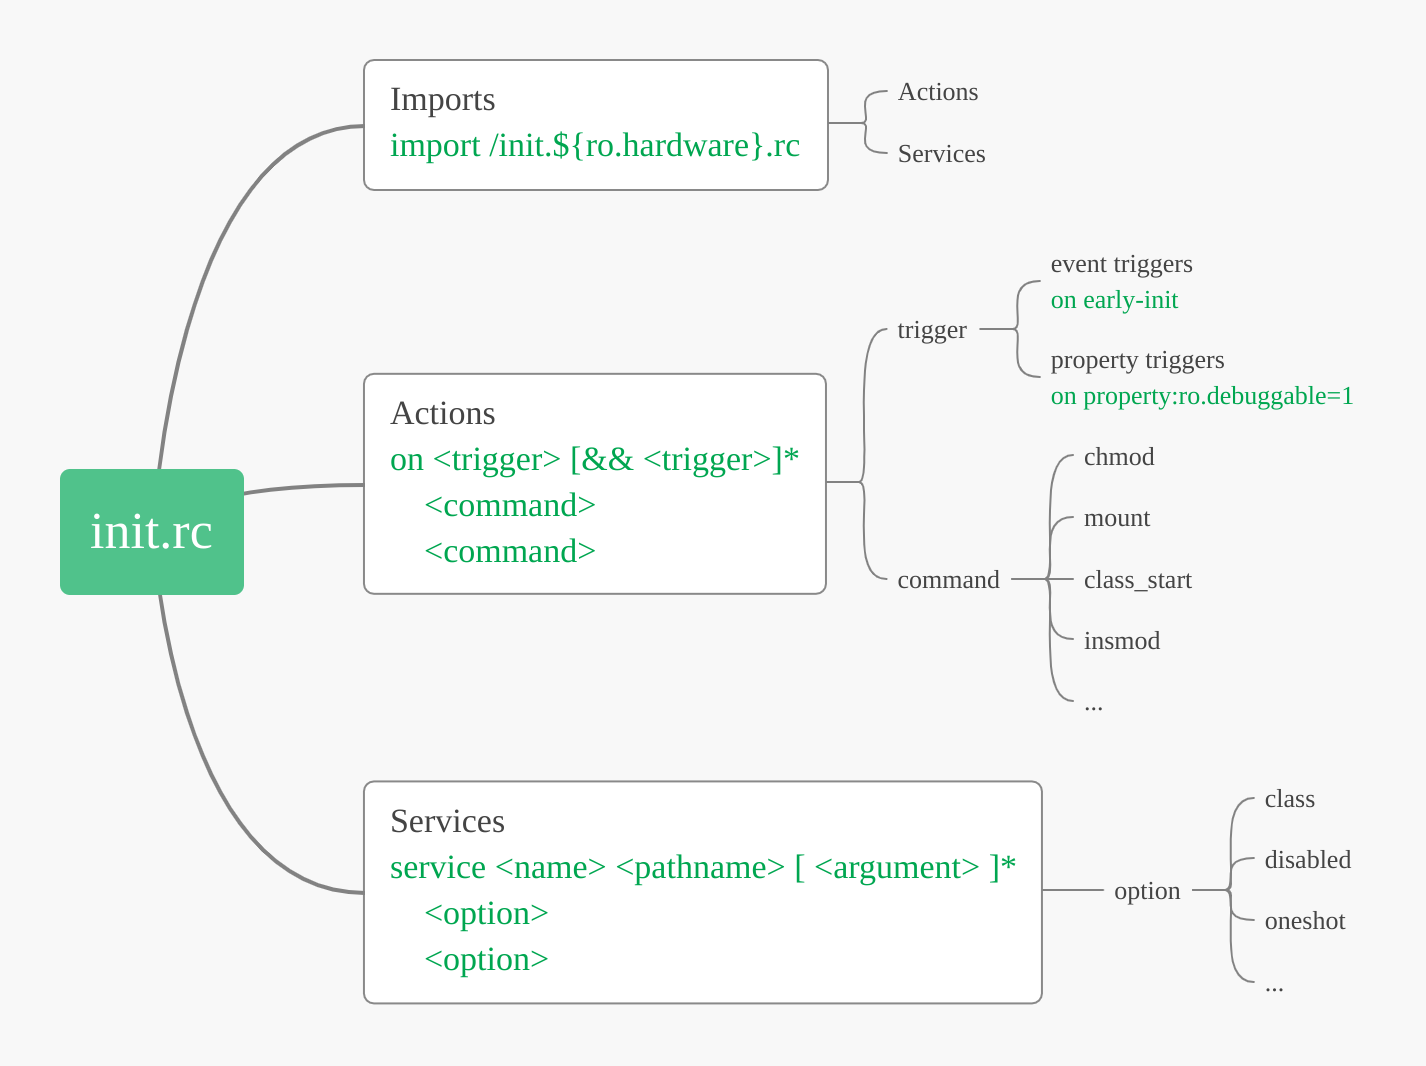
init.rc 由一个个 section 组成, 每一个 section 定义了一个 Action, 或者一个 Service。
Action 由 trigger 和 一组 command 组成。trigger 表示触发这个 Action 的条件, command 表示这个 Action 被触发后所执行的一系列动作。
Service 描述了一个服务的名字,执行路径,启动参数等信息。还可以通过 option 来约定服务的一些行为,权限等。比如是否只启动一次,服务进程的 uid, gid等。
init.rc 的所有语法介绍都可以在 Android/system/core/init/README.md 这个文件里面查找到,下面的大部分内容都是参考这个文档,顺便整理,扩展一下。
Android Init Language
The Android Init Language 主要由5种语法类型组成:
Actions, Commands, Services, Options, 和 Imports.
每一行是一个语句,单词之间用空格分开,如果单词中有空格可以用反斜杠 \ 转义,也可以用双引号 "" 来引用文本避免和空格冲突,如果一行语句太长可以用反斜杠 \ 换行, 如果一行以 # 开头(当然 # 前面可以是空白符: space, tab),则表示这行是注释。
在 init.rc 中我们可以使用系统属性 property,其使用方法跟 shell 语法中的变量引用是一样的,比如:import /init.recovery.${ro.hardware}.rc。其中 ro.hardware 就是一个系统属性,我们通过 ${property} 这种形式来引用。
每个 Action 和 Service 都定义了一个 Section, 所有的 Commands 和 Options 从属于紧挨着的 Actions 或 Services, 定义在第一个 Section 前的 Commands 和 Options 将被忽略掉。Service 的名称都唯一的, 如果定义了两个名称一样的 Service,那第二个 Service 将被忽略掉并打印错误日志。
Init .rc Files
Android Init Language 是用后缀为 .rc 的纯文本编写的, 而且是由多个分布在不同目录下的 .rc 文件组成, 如下所述:
/init.rc 是最主要的一个 .rc 文件, 它由 init 进程在开始执行的时候加载,主要负责系统初始化。
系统通过 init 进程的第一阶段 mount 机制会挂载 /system, /vendor 分区。这里简要说明一下, init 进程的启动是分为三个阶段的:
- FirstStageMain 主是要挂载文件系统,包括虚拟文件系统(/dev, /sys, /proc等), 和部分实际的文件系统(/sytem, /vendor, /odm等)。还有一部分文件系统是在第三阶段通过 mount_all fstab 来挂载的,比如说 /data。
- SetupSelinux 设置 Selinux 环境
- SecondStageMain 这个阶段才会加载 init.rc 文件
init 进程在加载完 /init.rc 文件之后,会接着加载 /{system,vendor,odm,product}/etc/init/ 这些目录下的所有 .rc 文件:
/system/etc/init/ 用于系统本身,比如 SurfaceFlinger, MediaService, and logcatd
/vendor/etc/init/ 用于SoC(系统级核心厂商,如高通), 为他们提供一些核心功能和服务
/odm/etc/init/ 用于设备制造商(odm定制厂商,如华为、小米),为他们的传感器或外围设备提供一些核心功能和服务
/product/etc/init/ 用于产品机型的配置
一些旧的设备是没有第一个阶段的挂载文件系统机制的,那些设备的 .rc 加载流程是这样的:
- /init.rc 会 import soc 厂商提供的 .rc 文件: /init.${ro.hardware}.rc
- /init.${ro.hardware}.rc 里面会有 mount_all 指令。当执行到 mount_all 指令时,init 进程会挂载所有文件系统,然后加载 /{system,vendor,odm}/etc/init/ 这些目录下的所有 .rc 文件。
system, vendor, odm, 或者 product 分区下的所有 binaries services 都有一个对应的 .rc 文件。这些 .rc 文件都放在各分区的 $partion/etc/init 目录下。Android.mk 中提供了一个 LOCAL_INIT_RC 配置, Android.bp 中也提供了一个 init_rc 配置。这两个配置可以为服务指定它的 .rc 文件。这里需要说明的是 service bin 编译到哪个分区,它对应的 .rc 文件也会编译到对应分区的 etc/init 目录。比如 system/core 目录下的 logd 模块,它的 Android.bp 如下:
1 | cc_binary { |
init_rc: ["logd.rc"] 配置指定了 logd 服务对应的 .rc 文件为当前目录下的 logd.rc。logd 会被编译到 /system/bin 目录,logd.rc 文件则会被编译到 /system/etc/init 目录。
将 .rc 根据不同服务分拆到不同文件中,要比之前放在单个 init.rc 文件好。 这种方案确保 init 进程读取的 service 和 action 信息能和同目录下的 Services 二进制文件更加符合, 不再像以前单个 init.rc 那样。另外,这样还可以解决多个 services 加入到系统时发生的冲突,因为他们都拆分到了不同的文件中。
在 mount_all 命令中有 “early” 和 “late” 两个可选项,当 early 设置的时候,init 进程将跳过被 latemount 标记的挂载操作,并触发 fs encryption state 事件,
当 late 被设置的时候,init 进程只会执行 latemount 标记的挂载操作,但是会跳过导入的 .rc 文件的执行. 默认情况下,不设置任何选项, init 进程将执行所有挂载操作
Actions
Actions 由一行行的命令序列组成。 trigger 用来决定什么时候触发这些命令, 当一个事件满足 trigger 的触发条件时, 这个 action 就会被加入到处理队列中(除非队列中已经存在)。
队列中的 action 按顺序取出执行, action 中的命令按顺序执行。 这些命令主要用来执行一些操作(设备创建/销毁,属性设置,进程重启等)。
Actions的格式如下:
1 | on <trigger> [&& <trigger>]* |
Actions 被加进队列的顺序是由包含这个 Action 的文件被 init 解析的顺序(import 的顺序)决定的。同一个 .rc 文件的多个 Action 命令也是出现在前面的优先入队列。
比如一个 .rc 文件有以下 Actions:
1 | on boot |
当 boot 事件被触发,且 property foobar 的值为 true 时,这些命令被执行的顺序是:
1 | setprop a 1 |
Services
Services 是 init 进程启动的程序, 我们可以配置 Services 在挂掉时是否自动重启。Services 的格式如下:
1 | service <name> <pathname> [ <argument> ]* |
- name : 服务名,也是服务运行的进程名
- pathname : 服务的可执行程序入口
- argument : 服务运行的参数
Options
Options是Services的参数配置. 它们影响Service如何运行及运行时机。下面对所有的 Options 进行说明:
capabilities [ <capability>\* ]
执行服务的时候设置 capability。关于capability的概念,简单来说,就是一种权限控制机制,相对于 uid, gid 来说更细粒度的权限控制。详细的权限列表请参考 capabilities。参数中的capability不需要CAP_前缀, 比如NET_ADMIN,或者SETPCAP。如果没有设置任何权限,则所有的权限都会被移除掉,即使这个服务是以 root 用户运行的也一样。class <name> [ <name>\* ]
为服务指定 class 名字。 同一个 class 名字的服务会被一起启动或退出, 默认值是default, 第二个 name 可以不设置, 用于service组。
开机动画和关机动画服务都应该包含animation这个 class。因为开机动画在系统启动过程中启动得非常早,然后在关机的时候又需要运行到最后一个关机阶段。在运行动画的过程中不能保证 /data 分区是已经挂载可用的了。开机动画和关机动画服务可以操作 /data 分区下的文件,但不能一直打开 /data 分区下的文件。而且当 /data 分区还没挂载时,也不能影响服务的运行。console [<console>]
这个选项表明服务需要一个控制台。 第二个参数 console 的意思是可以设置你想要的控制台类型,默认控制台是 /dev/console, /dev 这个前缀通常是被省略的, 比如你要设置控制台 /dev/tty0, 那么只需要设置为console tty0 即可。critical
表示服务是严格模式。 如果这个服务在4分钟内或者启动完成前退出超过4次,那么设备将重启进入 bootloader 模式。disabled
这个服务不会随着 class 一起启动。只能通过服务名来显式启动。比如 foobar 服务的 class 是 core, 且是 disabled 的,当执行class_start core时,foobar 服务是不会被启动的。 foobar 服务只能通过start foobar这种方法来启动。enter_namespace <type> <path>
Enters the namespace of type type located at path. Only network namespaces are supported with type set to “net”. Note that only one namespace of a given type may be entered.file <path> <type>
根据文件路径path来打开文件,然后把文件描述符fd传递给服务进程。type表示打工文件的方式,只有三种取值r,w,rw。对于 native 程序来说,可以通过 libcutils 库提供的android_get_control_file()函数来获取传递过来的文件描述符。举个例子, logd.rc 部分内容如下1
2
3
4
5
6
7service logd /system/bin/logd
socket logd stream 0666 logd logd
socket logdr seqpacket 0666 logd logd
socket logdw dgram+passcred 0222 logd logd
file /proc/kmsg r
file /dev/kmsg w
user logd其中通过
file /proc/kmsg r以只读方式打开了设备文件 /proc/kmsg, 然后在代码中这么获取打开的文件, 见 sytem/core/logd/main.cpp main 函数:1
2
3
4
5static const char dev_kmsg[] = "/dev/kmsg";
fdDmesg = android_get_control_file(dev_kmsg);
if (fdDmesg < 0) {
fdDmesg = TEMP_FAILURE_RETRY(open(dev_kmsg, O_WRONLY | O_CLOEXEC));
}这里可能有点奇怪,为什么要通过 file 这个选项来打开文件,而不直接在代码里面通过 open() 函数来打开呢?我觉得主要是权限问题,还是以 logd 为例子。/dev/kmsg 的权限是:
1
2
pure:/ # ls -l /dev/kmsg
crw------- 1 root root 1, 11 2020-02-27 21:49 /dev/kmsg只有 root 用户可读写。而 logd 服务是以
user logd选项来启动的,自然没有权限用 open() 函数来打开 /dev/kmsg 这个设备文件。file 选项则可以通过 init 进程把文件打开,然后把文件描述符传递给子进程, 从而解决了权限的问题。group <groupname> [ <groupname>\* ]
在启动 Service 前将 Service 的用户组改为第一个 groupname, 第一个 groupname 是必须有的, 第二个 groupname 可以不设置,用于追加组(通过setgroups)。目前默认的用户组是 root 组。但我觉得为了安全起见,默认用户组应该是 nobody 才对。interface <interface name> <instance name>
将这个服务进程与这个进程提供的一系列 services 关联起来。interface name参数必须是全限定名。这个配置的作用是允许 hwservicemanager 惰性启动服务进程。(我的理解是,这个服务不会开机自动启动,需要等其他进程显式的调用这个服务时,才会启动)。如果有多个 interfaces, 则多次使用interface这个选项来列举出来。比如 /vendor/etc/init/android.hardware.drm@1.0-service.rc :1
2
3
4
5
6service vendor.drm-hal-1-0 /vendor/bin/hw/android.hardware.drm@1.0-service
interface android.hardware.drm@1.0::ICryptoFactory default
interface android.hardware.drm@1.0::IDrmFactory default
class hal
user media
group mediadrm drmrpcioprio <class> <priority>
通过 SYS_ioprio_set 系统调用来设置此服务的 IO 优先级和 IO 优先级类别。class优先级类别必须是rt(real-time),be(best-effort) 或idle之一。priority优先级必须为 0 到 7 之间的整数。
keycodes <keycode> [ <keycode>\* ]
设置触发此服务的按键,可以是组合按键。如果这个组合键被按下了,这个服务就会启动。一般用来启动 bugreport 服务:
1 | service bugreport /system/bin/dumpstate -d -p -B -z \ |
我们也可以用一个 property 来替代键值列表。这种情况下只需要提供一个 property 即可。这个 property 的值为:以逗号分隔的键值列表;或者 “none” 表示不禁用组合键启动服务。
比如: keycodes ${some.property.name:-none}。 some.property.name 的值为 “123,124,125”。因为 keycodes 在 init 进程中是很早被处理的。所以只有在 PRODUCT_DEFAULT_PROPERTY_OVERRIDES 定义的 property 才可以使用。目前我还没见过这种用法,也不明白为什么要有这种用法。
memcg.limit_in_bytes <value>andmemcg.limit_percent <value>
这个主要是用来设置服务的内存使用限制。当服务的内存使用超出了限制,则会触发 oom kill。具体原理请搜索cgroup memory相关的知识。
limit_in_bytes 指按字节来限制; limit_percent 指按物理内存的百分比来限制。value 的值必须要大于 0。
这个配置需要 /dev/memcg 节点被挂载才会生效。memcg.limit_property <value>
通过 property 来设置memory.limit_in_bytes的值。这里 value 的值为一个 property 名。当设置了 memcg.limit_property 时,memcg.limit_in_bytes 和 memcg.limit_percent 的值将会被覆盖。memcg.soft_limit_in_bytes <value>
soft_limit_in_bytes: 内存软限制。
如果超过了 memcg.limit_in_bytes 所定义的限制,那么进程会被 oom killer 干掉或者被暂停,这相当于硬限制,因为进程无法申请超过自身 cgroup 限制的内存,但是软限制确是可以突破的。
我们假定一个场景,如果你的实体机上有四个 cgroup,实体机的内存总量是64G,那么一般情况我们会考虑给每个 cgroup 限制到16G内存。但是现实情况并不会这么理想,首先实体机上其他进程和内核会占用部分内存,这将导致实际上每个 cgroup 都不会真的有16G内存可用,如果四个 cgroup 都尽量占用内存的话,他们可能谁都不会到达内存的上限触发超限的行为,这可能将导致进程都抢不到内存而被饿死。
类似的情况还可能发上在内存超卖的环境中,比如,我们仍然只有64G内存,但是确开了8个cgroup,每个都限制了16G内存。这样每个 cgroup 分配的内存之和达到了128G,但是实际内存量只有64G。这种情况是出于绝大多数应用可能不会占用满所有的内存来考虑的,这样就可以把本来属于它的那份内存”借用”给其它 cgroup。如果全局内存已经耗尽了,但是某些 cgroup 还没达到他的内存使用上限,而它们此时如果要申请内存的话,此时该从哪里回收内存?如果我们配置了 memcg.soft_limit_in_bytes,那么内核将去回收那些内存超过了这个软限制的 cgroup 的内存,尽量缩减它们的内存占用达到软限制的量以下 ,以便让没有达到软限制的 cgroup 有内存可以用。在没有这样的内存竞争以及没有达到硬限制的情况下,软限制是不会生效的。还有,软限制的起作用时间可能会比较长,毕竟内核要平衡多个cgroup的内存使用。
根据软限制的这些特点,我们应该明白如果想要软限制生效,应该把它的值设置成小于硬限制。
memcg.swappiness <value>
swappiness 的值的大小对如何使用 swap 分区是有着很大的联系的。swappiness=0 的时候表示最大限度使用物理内存,然后才是 swap 空间,swappiness=100 的时候表示积极的使用 swap 分区,并且把内存上的数据及时的搬运到 swap 空间里面。不过在 Android 系统上好像没有见过 swap 分区。namespace <pid|mnt>
当 fork 这个 service 时,设置 pid 或 mnt namespace。目前也没发现哪个服务有用到这个 option。oneshot
当服务退出的时候,不自动重启。适用于那些开机只运行一次的服务。onrestart
在服务重启的时候执行一个命令。这个命令并不是 shell 命令哦,具体可以执行的命令有哪些,文章后面会介绍。oom_score_adjust <value>
设置服务的 /proc/$pid/oom_score_adj 的值为 value,在 -1000 ~ 1000之间。值越大,越可能被 oom Killer 杀掉。override
指定此服务要覆盖之前定义的同名服务。前面我们有说过,服务名是唯一的,重复定义的话,后面的定义会被忽略。但我们可以通过 override 来使用后面定义的服务来覆盖前面的。一般的使用场景是使用 /odm 分区定义的服务来覆盖 /vendor 分区定义的同名服务。init 进程将以最后解析到的服务定义为准,因此我们要特别关注 init.rc 文件被解析的顺序。priority <priority>
设置服务的 cpu 调试优先级。取值范围为 -20 ~ 19。默认值是 0。实质上是通过 setpriority() 函数调用来设置优先级。restart_period <seconds>
如果一个非 oneshot 的服务退出了,它将会在设置的 period 时间周期内重新启动。为了限制服务的崩溃频率,默认周期是 5 秒。对于一些本应该周期运行的服务来说,我们可以增加这个周期。比如说,可以设置成 3600 来指定服务每小时运行一次。或者指定为 86400 来指定服务每天运行一次。rlimit <resource> <cur> <max>
rlimit 是 resource limit 的意思。每个进程在运行时系统不会无限制的允许单个进程不断的消耗资源,因此都会设置资源限制。Linux 系统中使用 resource limit 来表示,每个进程都可以设置不同的资源限制,rlimit 的设置是会传递给子进程的,也就是以这个 service 为根节点的进程树上的所有进程都会受这个设置的影响。关于 rlimit 的介绍请自行搜索。seclabel <seclabel>
在启动 Service 前设置指定的 seclabel,默认使用init的安全策略。 主要用于在 rootfs 上启动的 service,比如 ueventd, adbd。 在系统分区上运行的 service 有自己的 SELinux安全策略。setenv <name> <value>
设置进程的环境变量。shutdown <shutdown_behavior>
设置关机时这个服务的行为。如果没有设置,这个服务在关机时将会被 SIGTERM 和 SIGKILL 杀掉。如果指定了shutdown critical,则这个服务在关机过程中不会被杀掉,直接关机超时。
如果这个服务指定了shutdown critical,且在开始关机时这个服务没有在运行,则这个服务将会被启动。servicemanager, vold 等服务设置了这个 option。sigstop
在服务被启动的时候马上发送 SIGSTOP 信号给这个服务。这个选项一般是用来调试的。文章后面介绍 debugging 的时候会说明怎么使用这个选项。socket <name> <type> <perm> [ <user> [ <group> [ <seclabel> ] ] ]
创建一个 unix domain socket, 路径为/dev/socket/name, 并将fd返回给Service。 type 只能是 “dgram”, “stream” or “seqpacket”。
user 和 group 默认值是 0。 seclabel 是这个 socket 的 SELinux security context, 它的默认值是 service 的security context或者基于其可执行文件的security context。
在代码中,可以通过 libcutils 库提供的 android_get_control_socket 函数来获取这个 socket 的 fd。logd 服务就使用到了这个 option。1
2
3
4
5
6
7service logd /system/bin/logd
socket logd stream 0666 logd logd
socket logdr seqpacket 0666 logd logd
socket logdw dgram+passcred 0222 logd logd
file /proc/kmsg r
file /dev/kmsg w
user logdtimeout_period <seconds>
设置一个超时周期,当到达超时周期,服务将会被 kill 掉。如果服务被设置了 oneshot 自然不会被重启。但其他非 oneshot 服务则会被自动重启。这个 option 通常和上面提到过的 restart_period 结合使用,定义一个周期性的服务。updatableMark that the service can be overridden (via the ‘override’ option) later in
the boot sequence by APEXes. When a service with updatable option is started
before APEXes are all activated, the execution is delayed until the activation
is finished. A service that is not marked as updatable cannot be overridden by
APEXes.user <username>
在启动 Service 前修改进程的所属用户, 默认启动时 user 为 root (安全起见,或许默认应该是 nobody)。
在Android M版本,如果一个进程想拥有 Linux capabilities(相当于Android中的权限吧),也只能通过设置这个值。 以前,一个程序要想有 Linux capabilities,必须先以root身份运行,然后再降级到所需的uid。现在已经有一套新的机制取而代之,它通过 fs_config 允许厂商赋予特殊二进制文件 Linux capabilities。 这套机制的说明文档在 https://source.android.google.cn/devices/tech/config/filesystem.html。 当使用这套新的机制时,程序可以通过 user 参数选择自己所需的 uid, 而不需要以 root 权限运行. 在 Android O 版本,程序可以通过 capabilities option 直接申请所需的能力,参见上面的 capabilities 说明。writepid <file> [ <file>\* ]
当 Service 调用 for 时将子进程的 pid 写入到指定文件. 用于 cgroup/cpuset 的使用,当 /dev/cpuset/ 下面没有文件但 ro.cpuset.default 的值却不为空时, 将pid的值写入到 /dev/cpuset/${ro.cpuset.default}/tasks 文件中。
Triggers
Triggers 的作用是用来触发 Actions 的执行。Triggers 可以分为 event triggers 和 property triggers。
event triggers 由 trigger 命令 或者在 init 中使用 QueueEventTrigger 函数触发。它的格式是个简单的字符串,比如’boot’ 或 ‘late-init’。
property triggers 是在 property 被设置或发生改变时触发。 格式是on property:property_name=property_value。
一个 Action 可以有多个 property triggers, 但是只能有一个 event trigger。比如:on boot && property:a=b 定义的 Action 只有在 boot 这个 event trigger 被触发,且 property a = b 时,这个 Action 才会执行。on property:a=b && property:c=d 定义的 Action 在以下三种情况都会执行:
- 系统启动时 property a=b 且 property c=d。
- 系统运行过程中, 当 property a 的值变成 b, 且这个时候 property c 的值已经是 d.
- 系统运行过程中, 当 property c 的值变成 d, 且这个时候 property a 的值已经是 b.
Commands
Command 是 Action 被触发后,可以执行的一系列命令。这些命令并不是 shell 命令。下面介绍一下都有哪些命令可以使用。
bootchart [start|stop]
启动或者停止 bootchart。这两个 command 出现在 init.rc 这个文件中,但只有在 /data/bootchart/enabled 这个文件存在的时候 bootchart 才会执行。否则 bootchart start/stop 不做任何操作。chmod <octal-mode> <path>
修改文件的权限,这个跟我们使用 shell 命令的格式是一样的。权限以 8 进制数指定。chown <owner> <group> <path>
修改文件属主。格式跟 shell 命令有点差别。 shell 命令的格式是 chown [user][:[group]]class_start <serviceclass>
启动所有 class 是<serviceclass>的 service(如果服务未启动的话,才启动)。class_start_post_data <serviceclass>
与class_start相似, 但是只考虑那些在 /data 分区被挂载之后才启动的服务, 或者系统运行过程中class_reset_post_data命令被调用。这个命令只适用于开启了 FDE(Full-Disk Encryption 全盘加密) 的设备。class_stop <serviceclass>
停止所有 class 为<serviceclass>且正在运行的服务。并且把这些服务设置为 disable。也就是不能再通过 class_star 来启动,只能通过 start service_name 这种指定服务名的方式显式启动。class_reset <serviceclass>
停止所有 class 为<serviceclass>且正在运行的服务。但不会 disable 这些服务。这些服务还可以通过class_start来启动。class_reset_post_data <serviceclass>
与class_reset相似,但是只考虑那些在 /data 分区被挂载之后才启动的服务。这个命令只适用于开启了 FDE(Full-Disk Encryption 全盘加密) 的设备。class_restart <serviceclass>
重启所有 class 是<serviceclass>的服务。copy <src> <dst>
复制一个文件,与 write 命令相似,但适用于二进制文件或者大文件拷贝。
对于 src 文件来说,不允许从符号链接文件复制,也不可以从 world-writable(other用户可写) 或者 group-writable(组用户可写) 的文件复制。 linux 的文件权限位可以分为三组:文件属主权限,文件属主所在的用户组的权限,其他用户的权限。
对于 dst 文件来说,如果文件不存在的话,创建的文件默认权限是 0600。如果文件已经存在的普通文件,则这个文件会被清空。domainname <name>
设置 domain name.enable <servicename>
把一个 disable 的服务设置成 enable 状态。exec [ <seclabel> [ <user> [ <group>\* ] ] ] -- <command> [ <argument>\* ]
新建一个子进程并运行一个带指定参数的命令。 命令跟在--后面,以便前面可以指定 seclabel(安全策略),user(所有者),group(用户组)等选项。
直到这个命令运行完才可以运行其他命令。seclabel 可以设置为-表示用默认值, argument 可以使用属性扩展形式 ${property}。
直到子进程新建完毕,init进程才继续执行.
exec_background [ <seclabel> [ <user> [ <group>\* ] ] ] -- <command> [ <argument>\* ]
与 exec 相似,差别在于 exec_background 不会阻塞 init 进程的运行。exec_start <service>
与 exec 相似,但 exec_start 使用的是定义好的 service。export <name> <value>
设置全局环境变量。在执行这个命令之后再启动的所有进程都会继承这个环境变量。hostname <name>
设置 hostnameifup <interface>
启动指定的网络接口insmod [-f] <path> [<options>]
安装 path 指定的内核驱动模块(ko 文件)。-f参数:即使当前运行的内核版本与模块编译的内核版本不一致,也强制安装这个驱动模块。load_system_props
这个命令已经被 deprecated 了。load_persist_props
当 /data 分区被 decrypted 之后, 加载 /data 分区下的 persistent 属性。在 init.rc 这个文件里面有执行这个命令。loglevel <level>
设置 kernel 打印等级。level 可以使用属性扩展形式 ${property}。mark_post_data
/data 分区被挂载后,马上用这个命令来标志。用来实现class_reset_post_data和class_start_post_data命令。mkdir <path> [mode] [owner] [group]
创建目录。如果没有提供[mode] [owner] [group]的话,则默认权限是 755,默认用户,和组是 root。如果目录已经存在了,则目录的权限和用户属主会被更新。mount_all <fstab> [ <path> ]\* [--<option>]
调用 fs_mgr_mount_all 来挂载 fstab 指定的分区。挂载完之后,马上 import 这些分区 etc/init/ 目录下面的 .rc 文件。mount <type> <device> <dir> [ <flag>\* ] [<options>]
挂载 type 类型的 device 设备到 dir 目录。
flag 包括 “ro”, “rw”, “remount”, “noatime” 等。
options 包括 “barrier=1”, “noauto_da_alloc”, “discard” 等,使用逗号分隔,比如:barrier=1,noauto_da_allocrestart <service>
重启服务。如果服务正在运行,先 stop 再 start,如果服务没有运行则只需要 start。rm <path>
删除指定文件,实际上是调用 unlink 函数。可以使用exec -- rm path来替代。需要确保 path 所在的分区已经被挂载。rmdir <path>
删除指定目录,实际上是调用 rmdir 函数。readahead <file|dir> [--fully]
调用 readahead 函数把文件或目录下的文件加载到页面缓冲区。–fully option 表示加载整个文件。
Linux的文件预读 readahead,指Linux系统内核将指定文件的某区域预读进页缓存起来,便于接下来对该区域进行读取时,不会因缺页(page fault)而阻塞。因为从内存读取比从磁盘读取要快很多。预读可以有效的减少磁盘的寻道次数和应用程序的I/O等待时间,是改进磁盘读I/O性能的重要优化手段之一。setprop <name> <value>
设置 property。value 可以使用 property 扩展形式 ${property}。setrlimit <resource> <cur> <max>
设置资源限制。同上面 service option 里面提到的 rlimit。
cur 和 max 可以设置为 ‘unlimited’ 或者 ‘-1’ 表示不做限制。start <service>
如果指定服务没有在运行的话,则启动这个服务。stop <service>
如果指定的服务正在运行的话,则停止这个服务。symlink <target> <path>
创建软链接。sysclktz <mins_west_of_gmt>
设置系统时区。trigger <event>
触发一个 event 事件。umount <path>
umount 分区wait <path> [ <timeout> ]
查看指定路径是否存在。 如果发现则返回, 可以设置超时时间,默认值是5秒。这个命令会阻塞 init 进程的运行。之前优化开机速度时,就发现有人在 init.rc 里面用了 wait 命令,导致系统启动慢了几秒。wait_for_prop <name> <value>
等待 property 的值变成<value>。这个也会阻塞 init 进程的运行。write <path> <content>
打开 path 路径指定的文件,然后调用 write 函数往文件中写一个字符串 content。如果文件路径不存在,则会新创建一个文件。如果文件已经存在了,则文件会被清空。content的值可以使用 property 扩展形式 ${property}。
Imports
import 我觉得可以按 c 语言的 include 头文件来理解即可。主要是为了把配置文件按模块进行拆分,方便维护。
import <path>
导入 init rc 文件, 以括展当前文件的配置。如果 path 是个目录, 则导入这个目录下所有.rc文件,但是不会递归查找。
Properties
init 进程通过以下 property 可以提供一个状态信息:
init.svc.<name>
一个服务的运行状态:”stopped”, “stopping”, “running”, “restarting”
Boot timing
init 进程记录了一些启动过程中的耗时信息在 property 里面。
ro.boottime.init
从 boot 开始到 init 进程初始化第一阶段开始的时间,单位为 ns。ro.boottime.init.selinux
从初始化第一阶段开始到初始化 selinux 的耗时。其实也就是 init 进程第一阶段初始化的耗时了。ro.boottime.init.cold_boot_wait
ueventd 的冷启动耗时。
ro.boottime.<service-name>
从 boot 到 service 第一次启动的时间。
后面的部分内容跟 init.rc 文件的语法没有什么关系了,就不再展开了。后续再单独在其他文章中讨论以下部分的内容。
看完以上的介绍,相信同学们应该对 init.rc 文件有了大概的了解了。编写自己的服务,或者 Action 应该不成问题了。
Bootcharting
This version of init contains code to perform “bootcharting”: generating log
files that can be later processed by the tools provided by http://www.bootchart.org/.
On the emulator, use the -bootchart timeout option to boot with bootcharting
activated for timeout seconds.
On a device:
adb shell 'touch /data/bootchart/enabled'Don’t forget to delete this file when you’re done collecting data!
The log files are written to /data/bootchart/. A script is provided to
retrieve them and create a bootchart.tgz file that can be used with the
bootchart command-line utility:
sudo apt-get install pybootchartgui
# grab-bootchart.sh uses $ANDROID_SERIAL.
$ANDROID_BUILD_TOP/system/core/init/grab-bootchart.sh
One thing to watch for is that the bootchart will show init as if it started
running at 0s. You’ll have to look at dmesg to work out when the kernel
actually started init.
Comparing two bootcharts
A handy script named compare-bootcharts.py can be used to compare the
start/end time of selected processes. The aforementioned grab-bootchart.sh
will leave a bootchart tarball named bootchart.tgz at /tmp/android-bootchart.
If two such barballs are preserved on the host machine under different
directories, the script can list the timestamps differences. For example:
Usage: system/core/init/compare-bootcharts.py base-bootchart-dir exp-bootchart-dir
process: baseline experiment (delta) - Unit is ms (a jiffy is 10 ms on the system)
------------------------------------
/init: 50 40 (-10)
/system/bin/surfaceflinger: 4320 4470 (+150)
/system/bin/bootanimation: 6980 6990 (+10)
zygote64: 10410 10640 (+230)
zygote: 10410 10640 (+230)
system_server: 15350 15150 (-200)
bootanimation ends at: 33790 31230 (-2560)
Systrace
Systrace (http://developer.android.com/tools/help/systrace.html) can be
used for obtaining performance analysis reports during boot
time on userdebug or eng builds.
Here is an example of trace events of “wm” and “am” categories:
$ANDROID_BUILD_TOP/external/chromium-trace/systrace.py \
      wm am --boot
This command will cause the device to reboot. After the device is rebooted and
the boot sequence has finished, the trace report is obtained from the device
and written as trace.html on the host by hitting Ctrl+C.
Limitation: recording trace events is started after persistent properties are loaded, so
the trace events that are emitted before that are not recorded. Several
services such as vold, surfaceflinger, and servicemanager are affected by this
limitation since they are started before persistent properties are loaded.
Zygote initialization and the processes that are forked from the zygote are not
affected.
Debugging init
Launching init services without init is not recommended as init sets up a significant amount of
environment (user, groups, security label, capabilities, etc) that is hard to replicate manually.
If it is required to debug a service from its very start, the sigstop service option is added.
This option will send SIGSTOP to a service immediately before calling exec. This gives a window
where developers can attach a debugger, strace, etc before continuing the service with SIGCONT.
This flag can also be dynamically controled via the ctl.sigstop_on and ctl.sigstop_off properties.
Below is an example of dynamically debugging logd via the above:
stop logd
setprop ctl.sigstop_on logd
start logd
ps -e | grep logd
> logd          4343     1   18156   1684 do_signal_stop 538280 T init
gdbclient.py -p 4343
b main
c
c
c
> Breakpoint 1, main (argc=1, argv=0x7ff8c9a488) at system/core/logd/main.cpp:427
Below is an example of doing the same but with strace
stop logd
setprop ctl.sigstop_on logd
start logd
ps -e | grep logd
> logd          4343     1   18156   1684 do_signal_stop 538280 T init
strace -p 4343

(From a different shell)
kill -SIGCONT 4343

> strace runs
Host Init Script Verification
Init scripts are checked for correctness during build time. Specifically the below is checked.
1) Well formatted action, service and import sections, e.g. no actions without a preceding ‘on’
line, and no extraneous lines after an ‘import’ statement.
2) All commands map to a valid keyword and the argument count is within the correct range.
3) All service options are valid. This is stricter than how commands are checked as the service
options’ arguments are fully parsed, e.g. UIDs and GIDs must resolve.
There are other parts of init scripts that are only parsed at runtime and therefore not checked
during build time, among them are the below.
1) The validity of the arguments of commands, e.g. no checking if file paths actually exist, if
SELinux would permit the operation, or if the UIDs and GIDs resolve.
2) No checking if a service exists or has a valid SELinux domain defined
3) No checking if a service has not been previously defined in a different init script.
Early Init Boot Sequence
The early init boot sequence is broken up into three stages: first stage init, SELinux setup, and
second stage init.
First stage init is responsible for setting up the bare minimum requirements to load the rest of the
system. Specifically this includes mounting /dev, /proc, mounting ‘early mount’ partitions (which
needs to include all partitions that contain system code, for example system and vendor), and moving
the system.img mount to / for devices with a ramdisk.
Note that in Android Q, system.img always contains TARGET_ROOT_OUT and always is mounted at / by the
time first stage init finishes. Android Q will also require dynamic partitions and therefore will
require using a ramdisk to boot Android. The recovery ramdisk can be used to boot to Android instead
of a dedicated ramdisk as well.
First stage init has three variations depending on the device configuration:
1) For system-as-root devices, first stage init is part of /system/bin/init and a symlink at /init
points to /system/bin/init for backwards compatibility. These devices do not need to do anything to
mount system.img, since it is by definition already mounted as the rootfs by the kernel.
2) For devices with a ramdisk, first stage init is a static executable located at /init. These
devices mount system.img as /system then perform a switch root operation to move the mount at
/system to /. The contents of the ramdisk are freed after mounting has completed.
3) For devices that use recovery as a ramdisk, first stage init it contained within the shared init
located at /init within the recovery ramdisk. These devices first switch root to
/first_stage_ramdisk to remove the recovery components from the environment, then proceed the same
as 2). Note that the decision to boot normally into Android instead of booting
into recovery mode is made if androidboot.force_normal_boot=1 is present in the
kernel commandline.
Once first stage init finishes it execs /system/bin/init with the “selinux_setup” argument. This
phase is where SELinux is optionally compiled and loaded onto the system. selinux.cpp contains more
information on the specifics of this process.
Lastly once that phase finishes, it execs /system/bin/init again with the “second_stage”
argument. At this point the main phase of init runs and continues the boot process via the init.rc
scripts.